이전 글에서 이어집니다.
출력
현재 프로그램은 단일 셰이더 코드로 그림을 그리는 일엔 문제가 없다. 이제 그린 그림을 이미지 파일로 출력할 수 있게 만들 것이다. 사용할 라이브러리는 png다. 이름 그대로 png 파일을 생성하거나 읽을 수 있게 해준다. 창에 그려지는 이미지를 png로 출력하는 것이 이번 목표다. 크게 보면 이미지 데이터를 GPU 버퍼로 복사한 뒤, CPU, 즉 Rust 코드가 해당 데이터를 읽을 수 있게 하고, png가 이미지 파일로 저장하는 흐름이다.
지금은 창의 Surface로부터 얻어온 TextureView에 그림을 그린다. 이를 그대로 사용하지 않고 새 Texture를 만들어 사용할 것이다. 그렇게 하는 데는 세 가지 이유가 있다. 첫 번째, 창에서 얻어온 Texture는 기본적으로 데이터를 다른 버퍼로 복사하지 못한다. 두 번째, macOS가 사용하는 TextureFormat이 png의 형식과 일치하지 않는다. 세 번째, 출력하는 이미지 크기가 창의 크기로 고정된다. 물론 어떻게든 하면 창의 텍스처로 출력까지 할 수 있겠지만, 굳이 갈 필요가 없는 길이다. 따라서 새로운 텍스처를 만들고, 그 텍스처의 TextureView에 RenderPass로 그림을 그려 사용할 것이다.
fn draw_to(
    &self,
    view: &wgpu::TextureView,
    render_pipeline: &wgpu::RenderPipeline,
    width: u32,
    height: u32,
    frame: u32,
    time: f32,
) -> anyhow::Result<wgpu::SubmissionIndex> {
    let mut command_encoder = self
        .device
        .create_command_encoder(&wgpu::CommandEncoderDescriptor::default());
    {
        let mut render_pass = command_encoder.begin_render_pass(&wgpu::RenderPassDescriptor {
            label: Some("render_pipeline"),
            color_attachments: &[Some(wgpu::RenderPassColorAttachment {
                view,
                depth_slice: None,
                resolve_target: None,
                ops: wgpu::Operations {
                    load: wgpu::LoadOp::Clear(wgpu::Color {
                        r: 1.0,
                        g: 0.1,
                        b: 0.0,
                        a: 1.0,
                    }),
                    store: wgpu::StoreOp::Store,
                },
            })],
            depth_stencil_attachment: None,
            timestamp_writes: None,
            occlusion_query_set: None,
            multiview_mask: None,
        });
        render_pass.set_bind_group(0, &self.bind_group, &[]);
        render_pass.set_vertex_buffer(0, self.vertex_buffer.slice(..));
        render_pass.set_index_buffer(self.index_buffer.slice(..), wgpu::IndexFormat::Uint16);
        render_pass.set_pipeline(render_pipeline);
        render_pass.draw_indexed(0..6, 0, 0..1);
    }
    let command_buffer = command_encoder.finish();

    // uniform update
    let global_uniform = GlobalUniform {
        resolution: [width as f32, height as f32],
        frame,
        time,
    };
    self.queue
        .write_buffer(&self.global_uniform_buffer, 0, bytemuck::bytes_of(&global_uniform));

    // submit
    Ok(self.queue.submit([command_buffer]))
}
지금 TextureView에 그림을 그리는 코드는 GpuState의 render 메서드 안에 있다. 이를 view를 받아 그리는 메서드로 분리한다. 창에도 그리고 새로 만든 Texture에도 그려야 하기 때문이다. 현재 셰이더 코드가 해상도로 uv를 정의하고 있기에, global_uniform 갱신에 쓰이는 resolution과 frame, time도 입력받게 한다. 각 텍스처는 다른 TextureFormat을 사용해야 하니 format을 입력받는 RenderPipeline 또한 받아오게 한다.
pub fn render_to_bytes(
    &self,
    width: u32,
    height: u32,
    frame: u32,
    time: f32,
) -> anyhow::Result<Vec<u8>> {
    let texture = self.device.create_texture(&wgpu::wgt::TextureDescriptor {
        label: Some("texture"),
        size: wgpu::Extent3d {
            width,
            height,
            depth_or_array_layers: 1,
        },
        mip_level_count: 1,
        sample_count: 1,
        dimension: wgpu::TextureDimension::D2,
        format: wgpu::TextureFormat::Rgba8UnormSrgb,
        usage: wgpu::TextureUsages::COPY_SRC | wgpu::TextureUsages::RENDER_ATTACHMENT,
        view_formats: &[],
    });
    let view = texture.create_view(&wgpu::wgt::TextureViewDescriptor::default());
    self.draw_to(&view, &self.export_pipeline, width, height, frame, time)?;

    let width_to_bytes = width_to_bytes(width);
    let texture_buffer = self.device.create_buffer(&wgpu::wgt::BufferDescriptor {
        label: Some("texture_buffer"),
        size: (width_to_bytes * height) as u64,
        usage: wgpu::BufferUsages::COPY_DST | wgpu::BufferUsages::MAP_READ,
        mapped_at_creation: false,
    });

    let mut command_encoder = self
        .device
        .create_command_encoder(&wgpu::CommandEncoderDescriptor::default());
    command_encoder.copy_texture_to_buffer(
        texture.as_image_copy(),
        wgpu::TexelCopyBufferInfoBase {
            buffer: &texture_buffer,
            layout: wgpu::TexelCopyBufferLayout {
                offset: 0,
                bytes_per_row: Some(width_to_bytes),
                rows_per_image: Some(height),
            },
        },
        wgpu::Extent3d {
            width,
            height,
            depth_or_array_layers: 1,
        },
    );
    let command_buffer = command_encoder.finish();
    let submission_index = self.queue.submit([command_buffer]);

    texture_buffer.map_async(
        wgpu::MapMode::Read,
        ..,
        |result: Result<(), wgpu::BufferAsyncError>| {
            println!("{result:?}");
        },
    );
    self.device.poll(wgpu::PollType::Wait {
        submission_index: Some(submission_index),
        timeout: None,
    })?;

    let buffer_view = texture_buffer.get_mapped_range(..)?;
    let mut bytes = Vec::<u8>::new();

    for row in buffer_view.chunks(width_to_bytes as usize) {
        bytes.extend_from_slice(&row[..(width * 4) as usize]);
    }
    drop(buffer_view);
    texture_buffer.unmap();
    Ok(bytes)
}
Texture를 만들고 거기에 그림을 그린 뒤, Buffer를 생성한다. 해당 Buffer에 Texture의 데이터를 복사해 넣고 CPU가 버퍼 메모리에 접근할 수 있도록 매핑한다. 이후 매핑된 버퍼의 데이터를 읽어와 Vec<u8>에 담아 반환한다. 다시 말해 텍스처를 만들어 창에 그리는 것과 같은 그림을 그리고 그 데이터를 png가 읽을 수 있도록 바이트 메모리 형태로 반환하는 메서드다. 이를 하나씩 살펴보자.
let texture = self.device.create_texture(&wgpu::wgt::TextureDescriptor {
    label: Some("texture"),
    size: wgpu::Extent3d {
        width,
        height,
        depth_or_array_layers: 1,
    },
    mip_level_count: 1,
    sample_count: 1,
    dimension: wgpu::TextureDimension::D2,
    format: wgpu::TextureFormat::Rgba8UnormSrgb,
    usage: wgpu::TextureUsages::COPY_SRC | wgpu::TextureUsages::RENDER_ATTACHMENT,
    view_formats: &[],
});
let view = texture.create_view(&wgpu::wgt::TextureViewDescriptor::default());
self.draw_to(&view, &self.export_pipeline, width, height, frame, time)?;create_texture로 텍스처를 만든다. size는 Extent3d를 입력받고, depth_or_array_layers는 3차원 Texture에선 깊이, 2차원에선 몇 장이 겹쳐있는지다. 큐브 맵을 만들 때 사용하는 듯한데, 지금은 2차원 텍스처 한 장이니 1로 한다. mip_level_count는 mipmap을 몇 단계 만들지, sample_count는 MSAA(Multisample anti-aliasing)를 몇 단계로 할지인데, 지금은 둘 다 1로 한다. dimension은 2차원, format은 png가 지원하는 형식인 Rgba8UnormSrgb로 한다. Buffer에 복사하고, 이 Texture에 그림을 그릴 수 있도록 usage를 정한다. 마지막으로 view_formats는 기본 format 외 다른 형식으로 읽을 수 있게 하는 옵션인 듯한데, 지금은 비워둔다.
그렇게 만들어진 Texture에서 TextureView를 얻고 draw_to 메서드로 해당 Texture에 그림을 그린다. 참고로 RenderPipeline의 format이 Rgba8UnormSrgb여야 하기에 export_pipeline이란 이름으로 파이프라인을 따로 만들어 GpuState에 보관하고, Texture에 그림을 그릴 때 사용한다.
텍스처 버퍼 복사 256 규칙
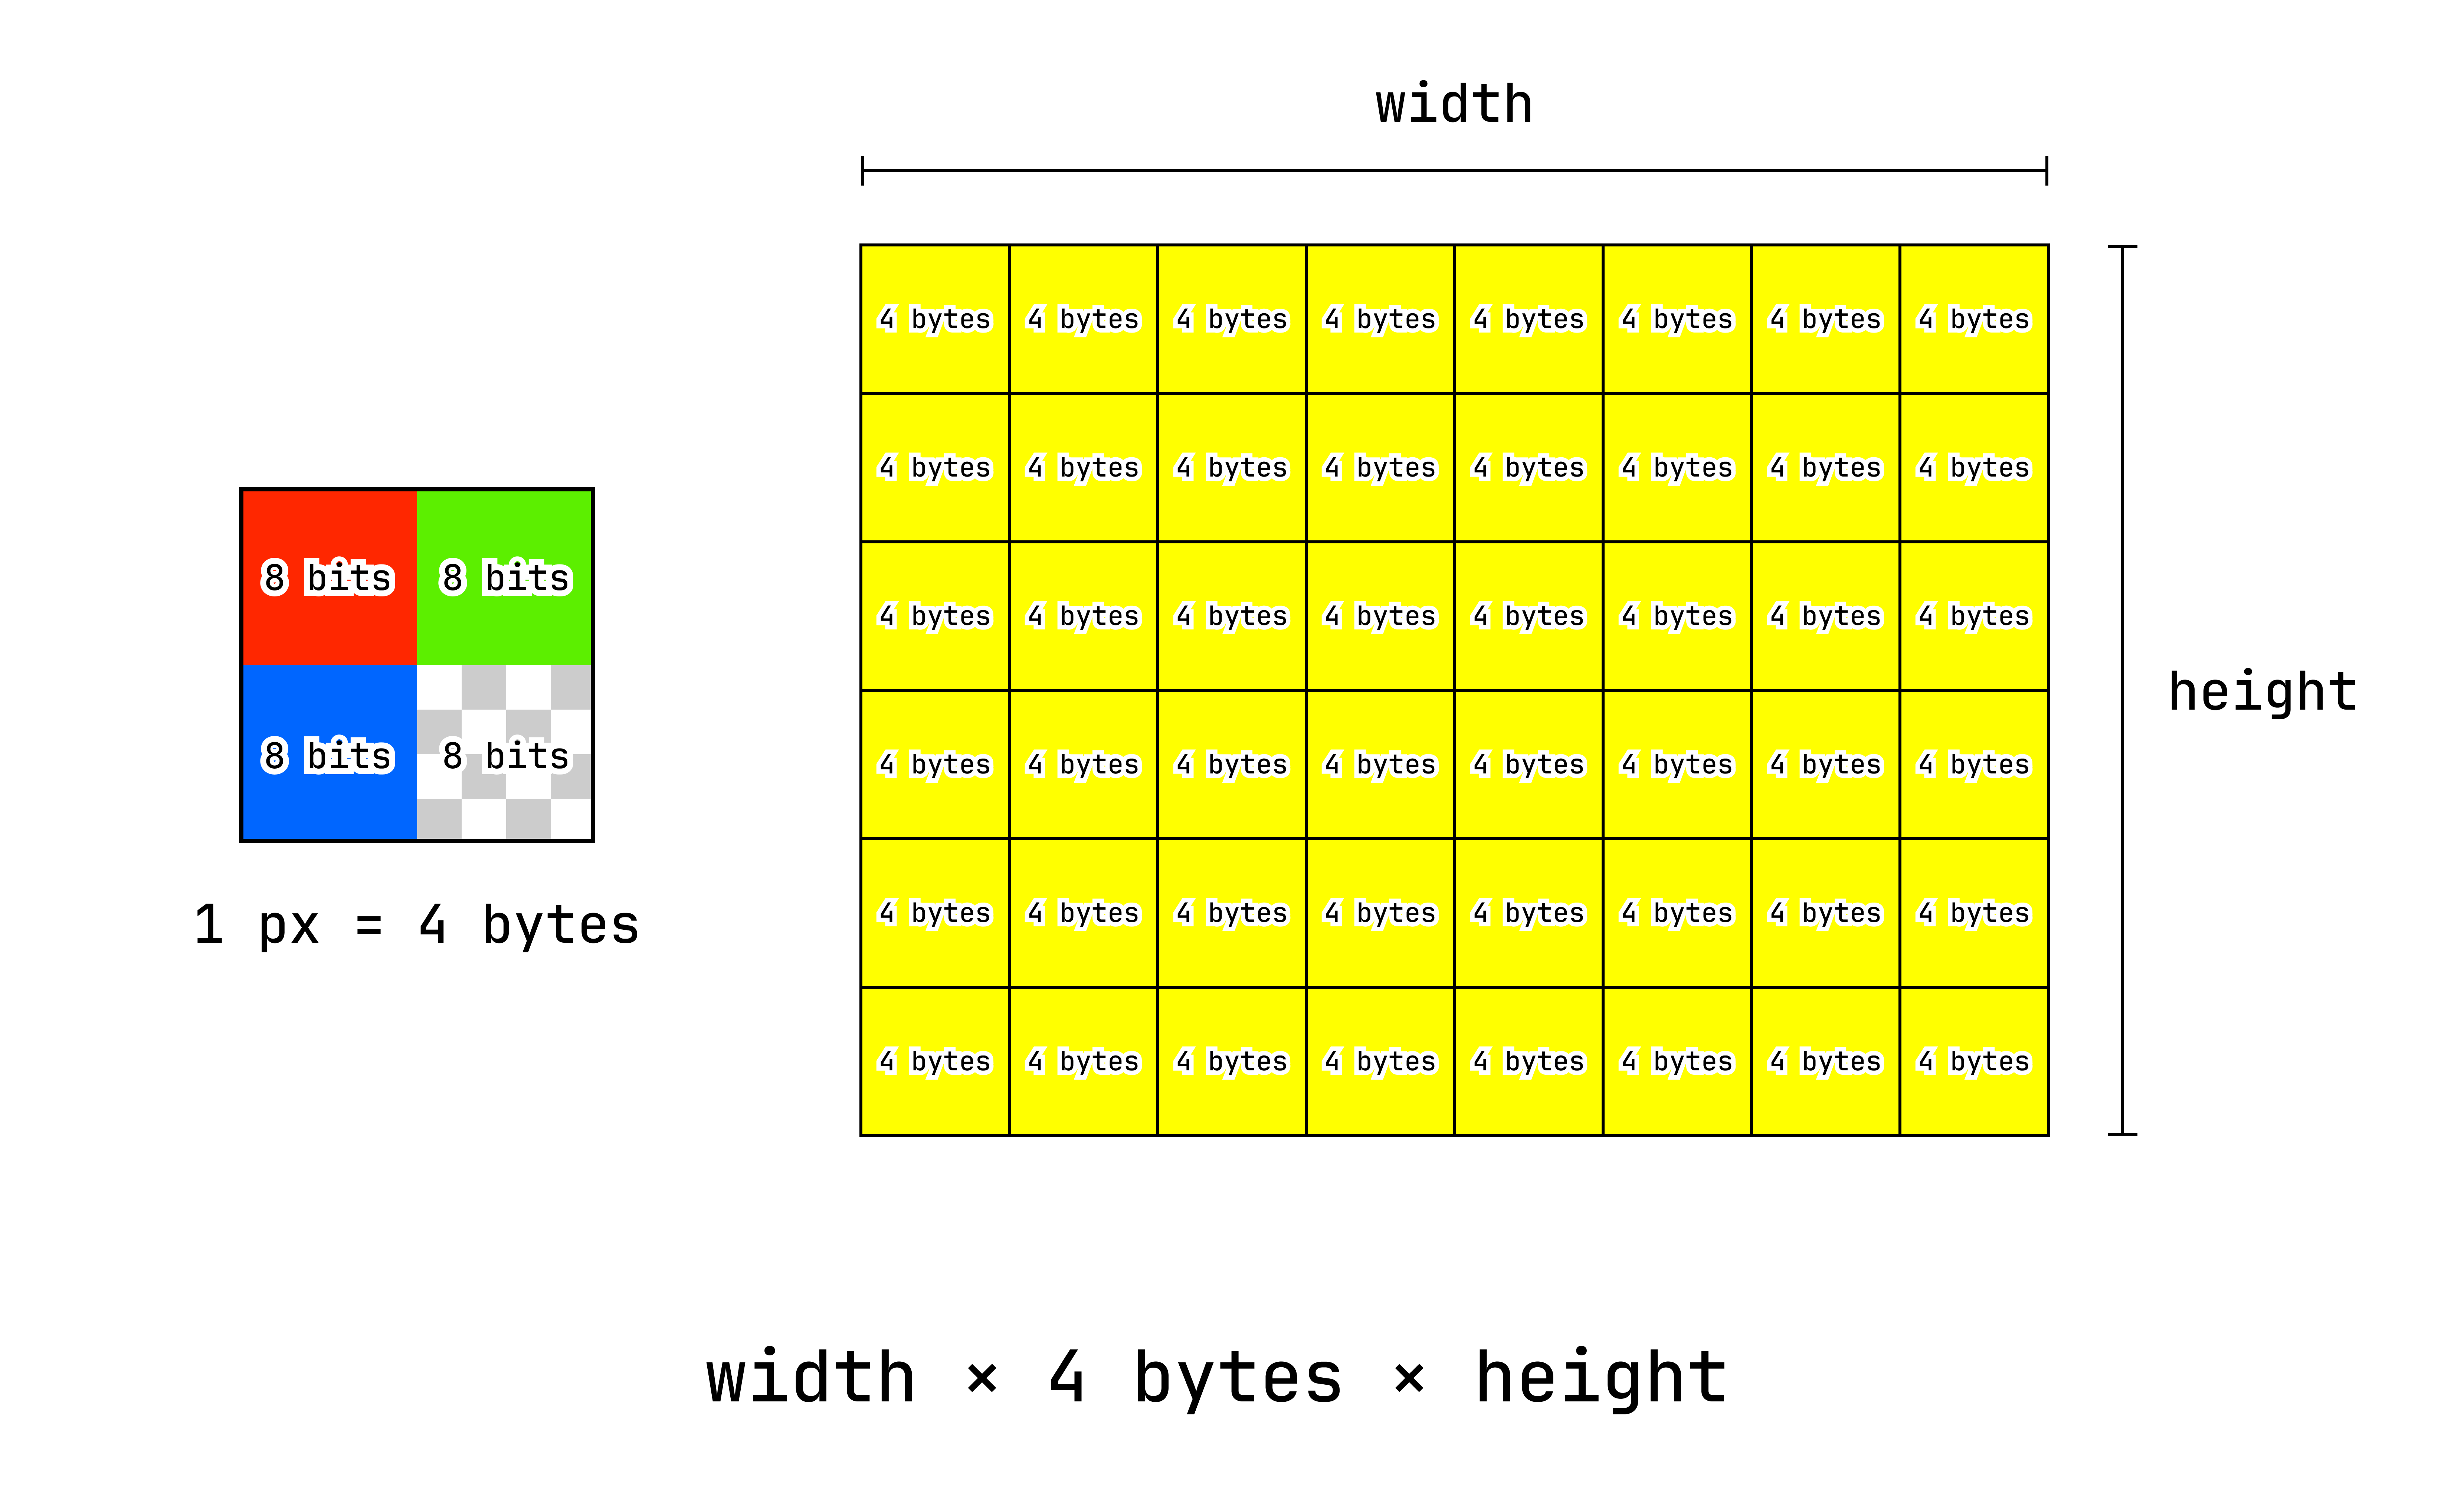
이제 Texture를 복사해 넣을 Buffer를 만든다. 한 픽셀에 rgba 각 8비트씩 총 4바이트이니, 이미지의 가로 해상도 × 4 × 세로 해상도가 버퍼의 총 크기가 될 것이다. 그러나 한 가지 문제가 있다.
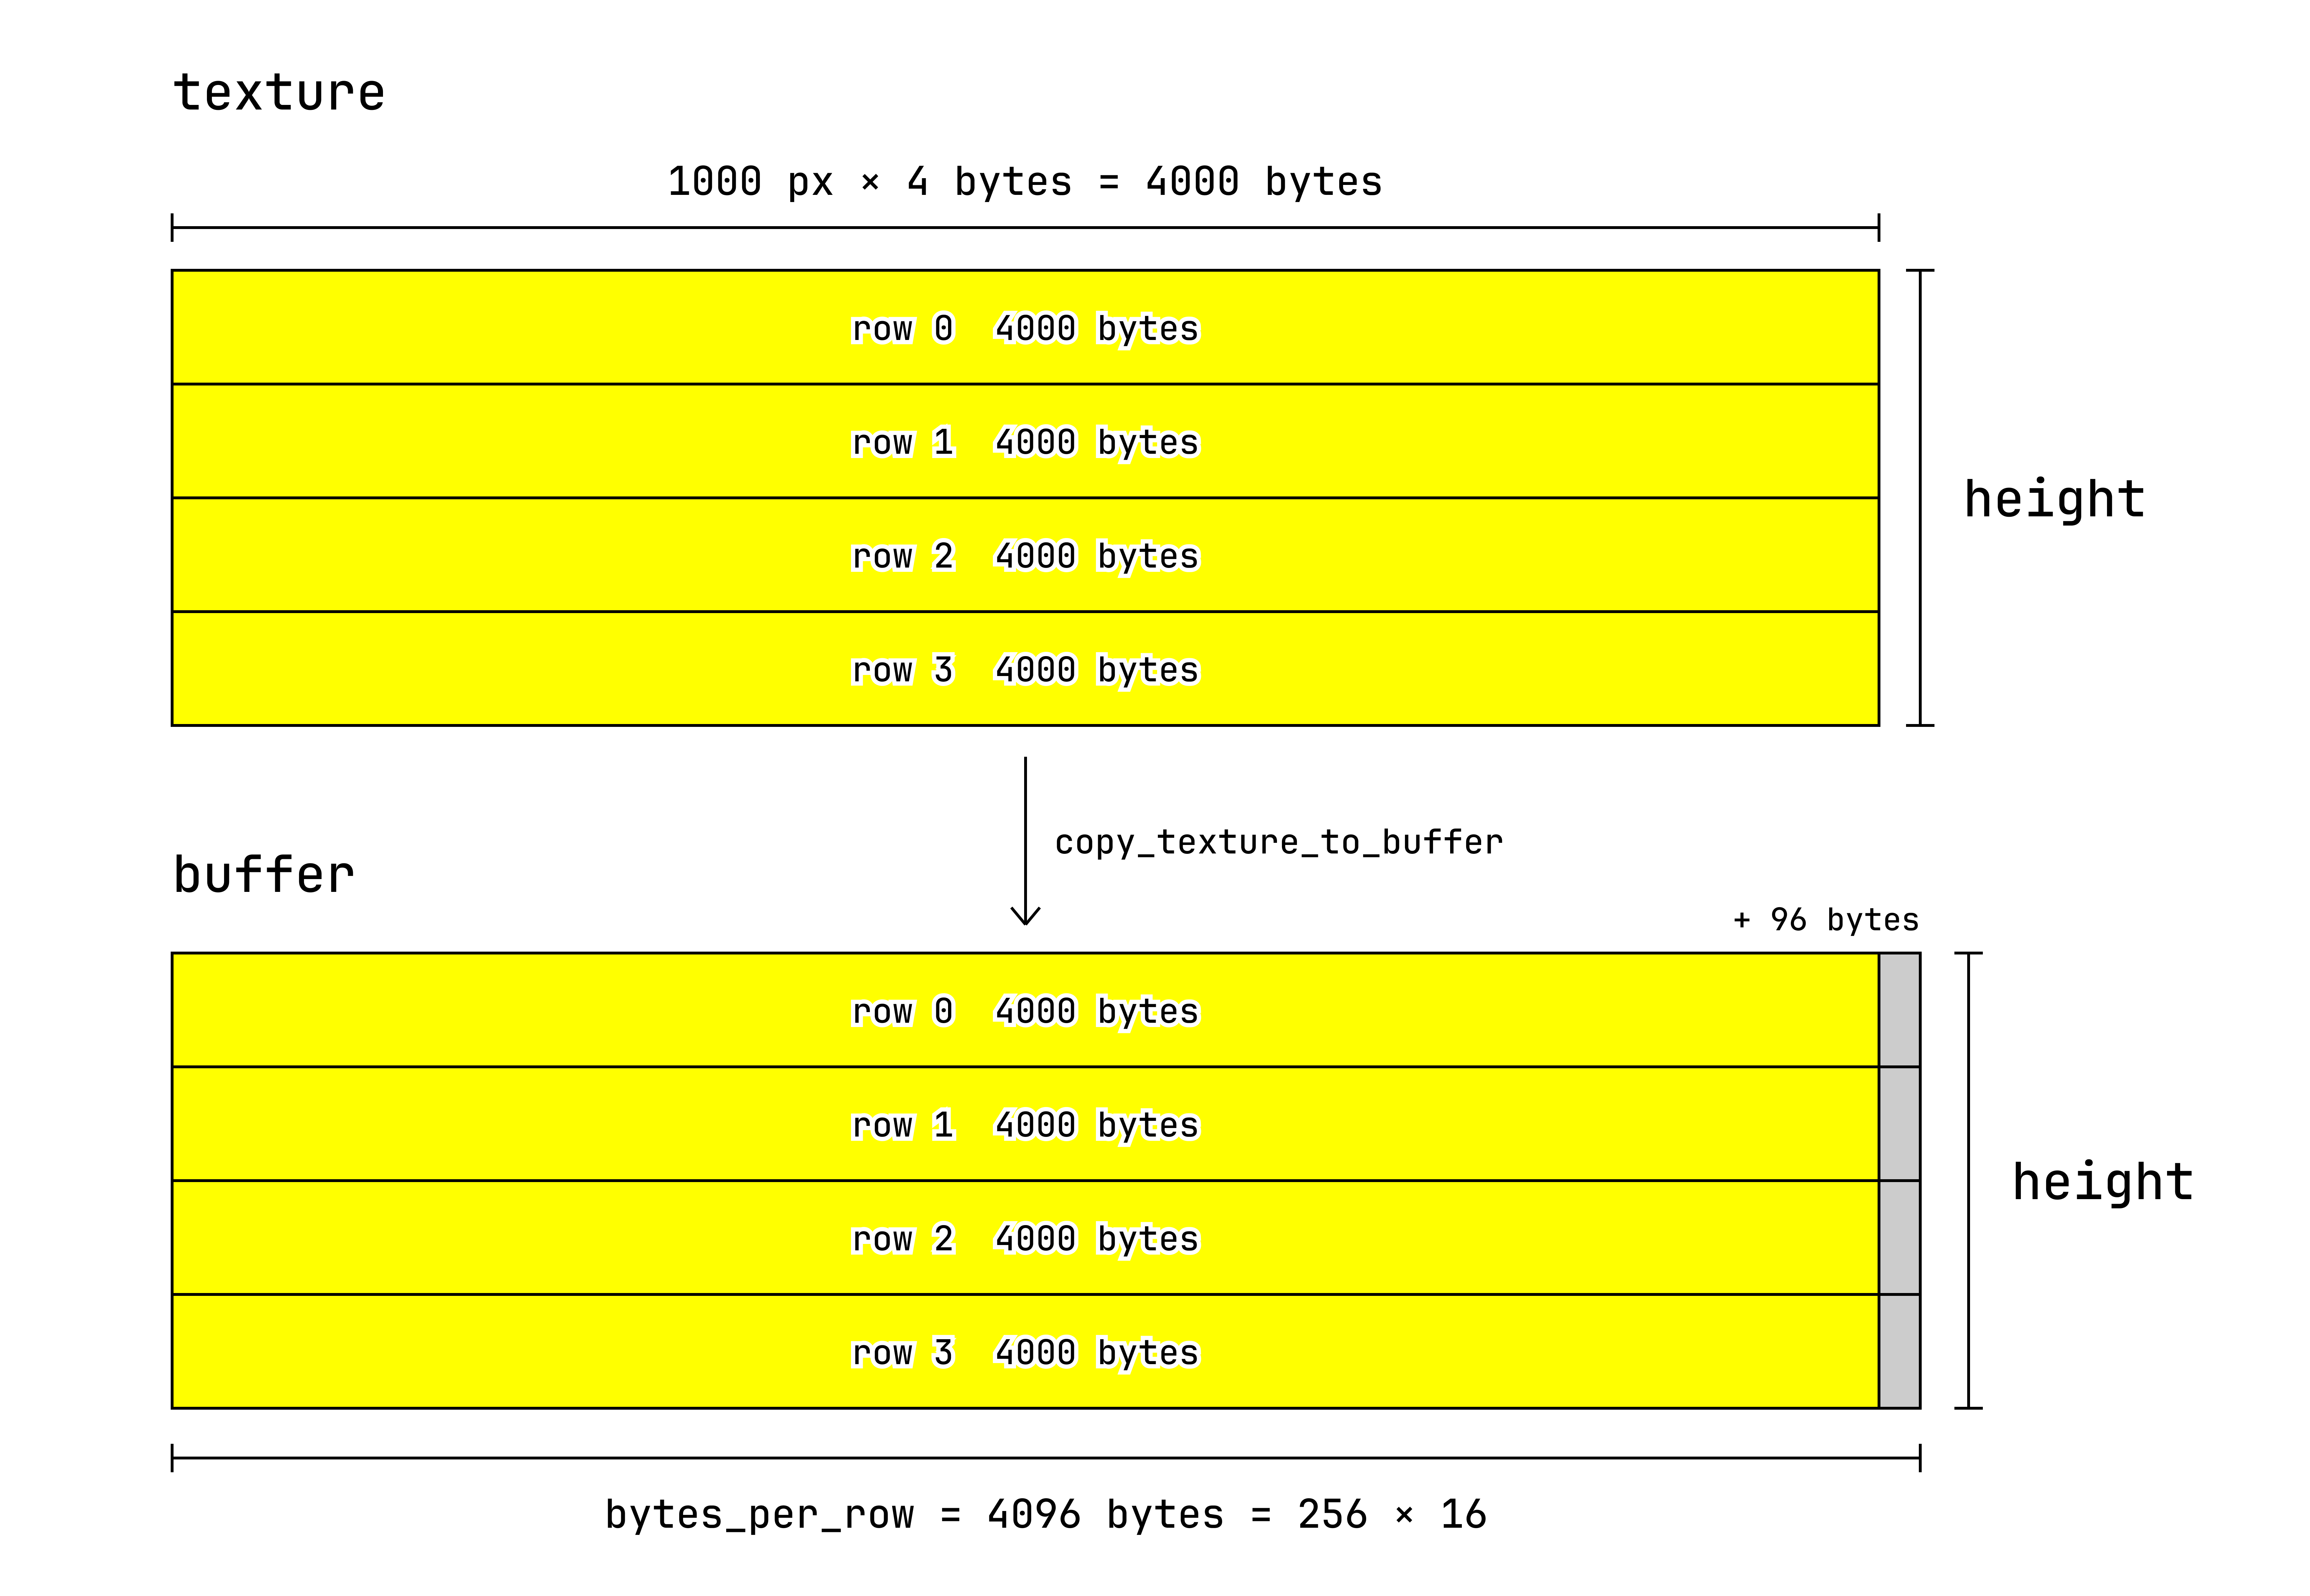
wgpu는 버퍼에 텍스처를 복사할 때 가로 한 행의 간격을 256의 배수로 맞춰 세로 해상도만큼 복사해 넣는다. wgpu는 다중 플랫폼을 지원해야 하기에 그래픽 API 중 가장 까다로운 규칙을 따르는데, 여기서는 DirectX의 256 배수 규칙이 그렇다. 1000px의 이미지를 원한다면 한 행을 4000byte가 아니라 256의 배수인 4096byte로 만들어야 한다. 따라서 가로 해상도를 받아 256의 배수 바이트로 돌려주는 함수가 필요하다.
fn width_to_bytes(width: u32) -> u32 {
    let bytes = width * 4;
    let align = wgpu::COPY_BYTES_PER_ROW_ALIGNMENT;

    if bytes % align == 0 {
        bytes
    }else {
        (bytes / align + 1) * align
    }
}
우선 입력받은 가로 해상도의 바이트가 256의 배수면 그대로, 아니면 256의 배수로 만들어 반환하는 함수를 만들었는데, 가장 좋은 연산인지는 모르겠다. test 돌렸을 때 문제없이 작동하니 일단 사용한다.
let width_to_bytes = width_to_bytes(width);
let texture_buffer = self.device.create_buffer(&wgpu::wgt::BufferDescriptor {
    label: Some("texture_buffer"),
    size: (width_to_bytes * height) as u64,
    usage: wgpu::BufferUsages::COPY_DST | wgpu::BufferUsages::MAP_READ,
    mapped_at_creation: false,
});
256 배수 바이트 반환 함수로 가로 한 행의 바이트 수를 구해 버퍼의 크기를 정한다. 이 버퍼에 텍스처 데이터를 복사할 예정이니 usage를 COPY_DST로 하고, CPU가 읽을 수 있도록 MAP_READ도 추가한다. mapped_at_creation은 만들어질 때 매핑되게 할지 여부인데, 현 상황에서 빈 버퍼를 읽는 건 무의미하니 false로 한다.
let mut command_encoder = self
    .device
    .create_command_encoder(&wgpu::CommandEncoderDescriptor::default());
command_encoder.copy_texture_to_buffer(
    texture.as_image_copy(),
    wgpu::TexelCopyBufferInfoBase {
        buffer: &texture_buffer,
        layout: wgpu::TexelCopyBufferLayout {
            offset: 0,
            bytes_per_row: Some(width_to_bytes),
            rows_per_image: Some(height),
        },
    },
    wgpu::Extent3d {
        width,
        height,
        depth_or_array_layers: 1,
    },
);
let command_buffer = command_encoder.finish();
let submission_index = self.queue.submit([command_buffer]);
복사는 GPU 측에서 이뤄지니 CommandEncoder를 만들어 버퍼에 복사하는 명령을 기록한다. copy_texture_to_buffer가 텍스처를 버퍼에 복사하는 명령이다. 이 명령은 크게 “어떤 텍스처의 어디를” → “어떤 버퍼의 어디로” → “얼마나” 세 종류의 입력을 받는다.
Texture의 as_image_copy로 텍스처 전체를 복사 대상으로 지정한다. 버퍼에는 offset 0부터 쓰고, 버퍼의 한 줄 간격(bytes_per_row)은 width_to_bytes 함수를 통해 256의 배수로 올림한 값으로 한다. 복사 크기(Extent3d)는 이미지 해상도 그대로 둔다. 그러면 GPU가 줄마다 실제 픽셀만큼 쓰고, 256의 배수까지 남은 칸은 건너뛰어 패딩이 된다. 예를 들어 1000 × 1000 해상도의 텍스처는 4000byte까지 복사한 뒤 버퍼의 다음 행 시작점인 4096byte까지는 건너뛰어 96byte 패딩이 만들어진다.
복사가 끝나면 CommandEncoder를 제출하고 SubmissionIndex를 반환받아 할당한다. 이는 바로 다음에 사용된다.
texture_buffer.map_async(
    wgpu::MapMode::Read,
    ..,
    |result: Result<(), wgpu::BufferAsyncError>| {
        println!("{result:?}");
    },
);
self.device.poll(wgpu::PollType::Wait {
    submission_index: Some(submission_index),
    timeout: None,
})?;
map_async 메서드로 버퍼를 CPU 메모리에 매핑해 읽고 쓸 수 있게 한다. 지금은 쓸 필요가 없으니 읽기 모드로, 버퍼의 전 영역을 지정한다. map_async는 이름처럼 비동기적으로 작동한다. 버퍼로 값을 복사하는 일은 GPU 측에서 이뤄지기에 요청을 보낸 뒤 바로 매핑할 수 없다. 따라서 map_async 매핑 요청만 보내고 돌아온다. GPU의 처리가 완료되었음은 Device의 poll로 확인할 수 있다. PollType을 Wait로 하고 복사 명령의 SubmissionIndex를 넣으면 해당 명령이 끝날 때까지 기다린다. poll이 버퍼에 복사가 끝났는지 확인하면 map_async를 통한 매핑 예약이 실제로 작동해 CPU가 버퍼에 접근할 수 있게 된다. poll이 예약된 매핑 작업을 끝내고 비로소 map_async의 콜백도 실행시킨다. 지금은 콜백으로 매핑 결과만 출력하게 한다.
let buffer_view = texture_buffer.get_mapped_range(..)?;
let mut bytes = Vec::<u8>::new();

for row in buffer_view.chunks(width_to_bytes as usize) {
    bytes.extend_from_slice(&row[..(width * 4) as usize]);
}
drop(buffer_view);
texture_buffer.unmap();
Ok(bytes)
매핑이 완료되면 BufferView를 반환하는 get_mapped_range로 버퍼에 접근할 수 있게 된다. Vec<u8>을 만들고 BufferView의 chunks로 버퍼를 한 행(bytes_per_row)씩 나눈 이터레이터를 얻고, extend_from_slice로 실제 이미지의 바이트 크기만큼만 Vec에 집어넣는다.
위 과정이 끝나면 매핑된 버퍼를 unmap으로 닫아줘야 한다. 버퍼가 매핑된 상태에선 CPU만 사용할 수 있다. 버퍼에는 GPU와 CPU 중 한쪽만 접근해야 한다. 양쪽에서 수정하고 읽으면 엉망이 될 테니까. unmap을 하면 그 메모리가 CPU에서 닫히고 다시 GPU 쪽 소유가 된다. 그 전에 BufferView라는 창구를 CPU가 계속 들고 있으면 안 되기에 drop하고 최종 바이트 덩어리를 반환한다.
PNG
이제 그림의 바이트 덩어리를 이용해 실제 png 파일로 내보내면 된다.
use anyhow;
use std::path::Path;
use std::fs::File;
use std::io::BufWriter;

pub fn save_png(
    path: &Path,
    width: u32,
    height: u32,
    bytes: &[u8],
) -> anyhow::Result<()> {
    let file = File::create(path)?;
    let ref mut w = BufWriter::new(file);

    let mut encoder = png::Encoder::new(w, width, height);
    encoder.set_color(png::ColorType::Rgba);
    encoder.set_depth(png::BitDepth::Eight);

    let mut writer = encoder.write_header()?;
    writer.write_image_data(bytes).unwrap();
    Ok(())
}
경로와 크기, 그리고 바이트 데이터를 입력받아 png로 저장하는 함수를 만든다. png crate Encoder 사용 예시대로 만들면 된다.
WindowEvent::KeyboardInput { event, .. } => {
    ...
    if state == winit::event::ElementState::Pressed {
        ...
        // 미리보기 추출
        if self.pressed_keys.contains(&PhysicalKey::Code(KeyCode::KeyS))
            && self.pressed_keys.contains(&PhysicalKey::Code(KeyCode::SuperLeft))
        {
            if let Some(gpu) = &self.gpu_state {
                let (frame, time) = self.playback_state.frame_time();
                let (width, height) = gpu.size();

                let bytes = match gpu.render_to_bytes(width, height, frame, time) {
                    Ok(bytes) => bytes,
                    Err(err) => {
                        eprintln!("render_to_bytes: {err}");
                        return;
                    }
                };

                let file_name = format!("capture_{frame}.png");
                let path = Path::new("outputs").join(file_name);
                match save_png(&path, width, height, &bytes) {
                    Ok(()) => {
                        println!("추출 완료: {:?}, {}×{}", path, width, height)
                    }
                    Err(err) => {
                        eprintln!("추출 실패: {err}");
                    }
                }
            }
        }
    }
}
...
render_to_bytes로 그림을 바이트 데이터로 받아와서 save_png 함수의 입력으로 사용해 내보내면 된다. 내보내는 파일명과 경로를 정하고 문제가 생기면 오류를 출력하고 프로그램은 이어지게 처리한다. 일단 Cmd + S를 입력하면 창 크기로 저장되도록 했다. 이처럼 창에서 바로 캡처하는 기능뿐 아니라 창 없이 원하는 크기로 추출하는 기능 또한 추가할 예정이다.
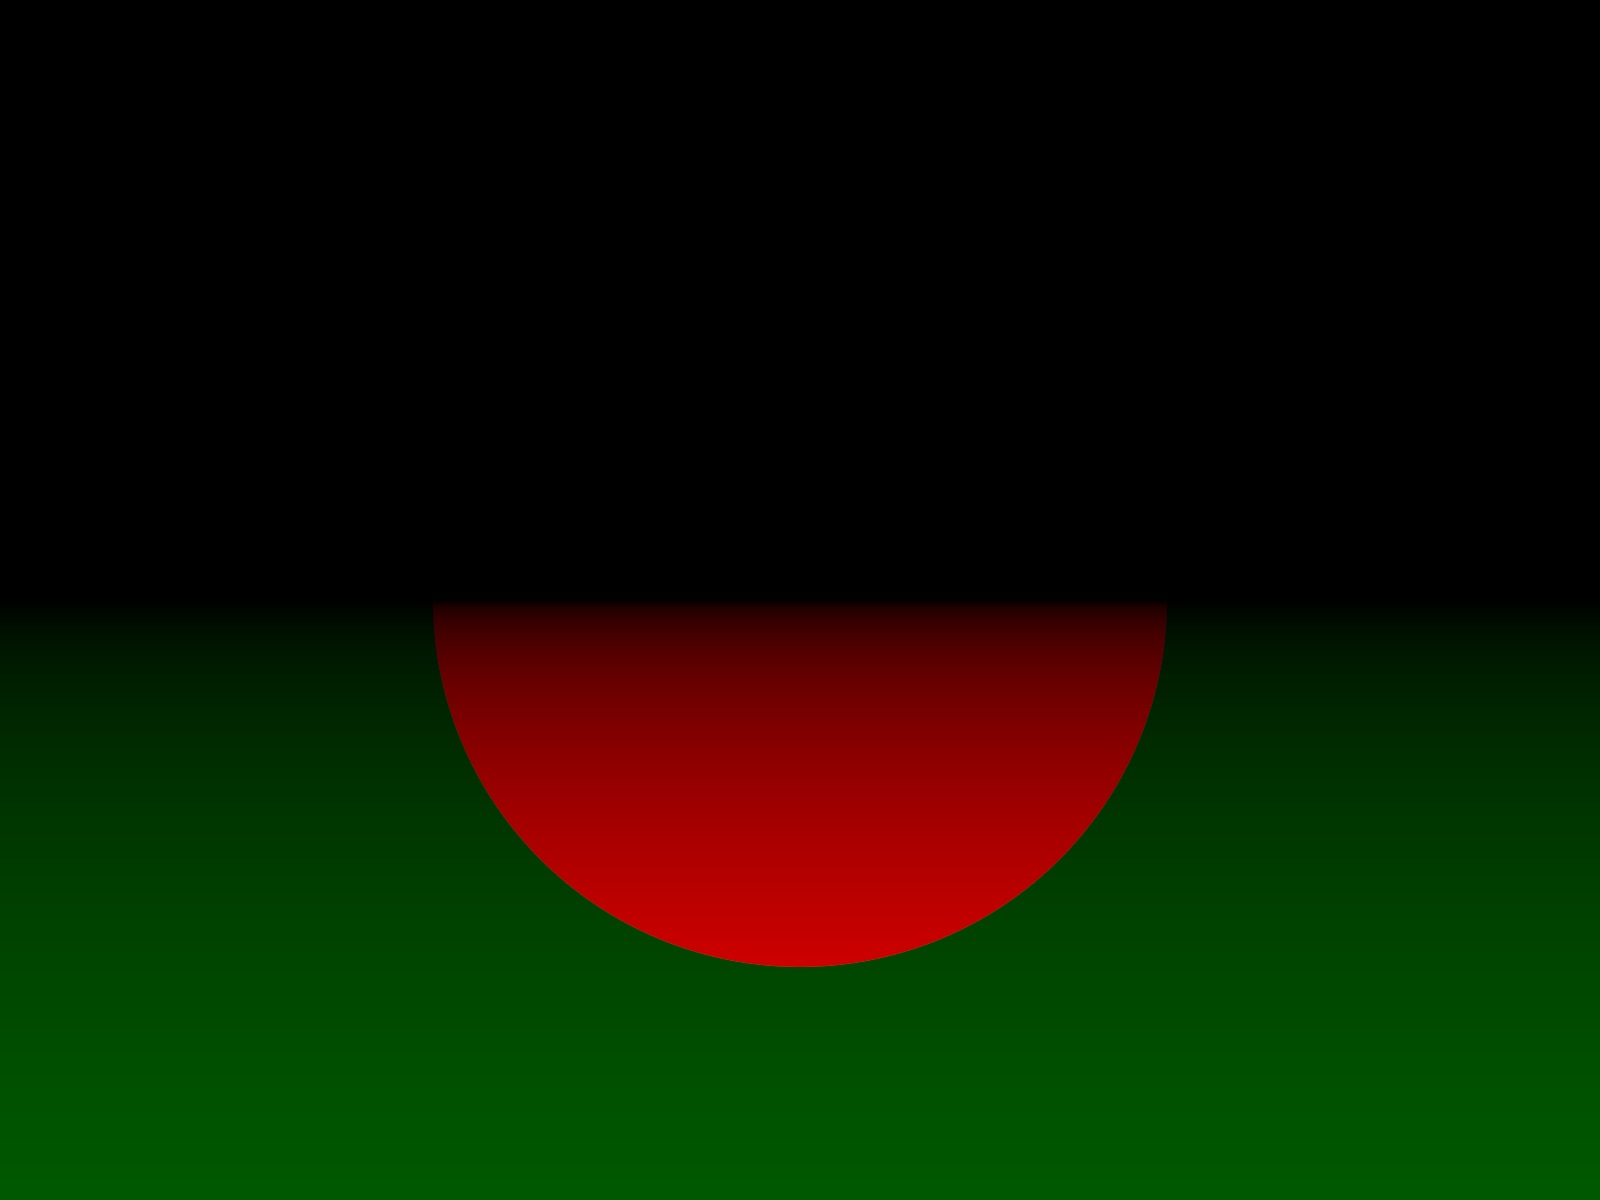
원래 방글라데시 국기 같은 이미지였는데, 출력 시 y축이 올바른지 확인하기 위해 uv.y를 곱했다. 이렇게 이미지 출력까지 가능한, 어엿한 렌더러를 완성했지만 이제 절반 왔을 뿐, 제작은 이어진다.
다음 글로 이어집니다.